Minecraft Smile Chunk Finder:- Minecraft has been famous and enduring gameplay since 2009, developed by Mojang, it has been quite a stress-buster game with a flexible plot, allowing no specific task during the active time, but enabling the imagination and creativity to the full extent for building, destroying, exploring, surviving, and crafting, which makes it more intriguing for every turn. In the previous post, we talked about Minecraft Circle Chart & Nether Portal Calculator. Now going to explain on Minecraft Smile Chunk Finder.
Contents
What is Slime Chunk Finder?
According to the classic game format, Chunks are units coined by the world creates to divide the whole map into accessible and comprehensive parts. In the coordinate system, it is 256 blocks in height(in the z-axis) while 16 in length(along the x-axis) as 16 in breadth(along the y-axis).
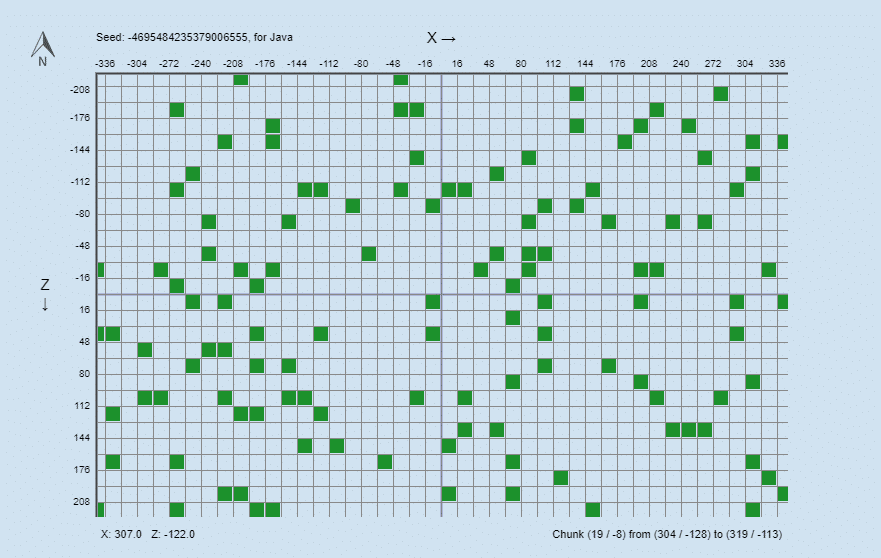
In simple words, Chunks have a width of 16×16 blocks (x and z-axis) and a height of 256 blocks (y-axis). Slime chunks are predetermined by your save game’s seed and are always the same for a particular seed. Just as the terrain created is, observing the slime spawns the only way to locate slime chunks in play without using third-party software.
Minecraft Official Website:- https://www.minecraft.net/
There is no slime spawning in my chunk of slime?
Slimes only spawn in slime chunks on layer 39 and below (feet pos). On those layers, the spawning rate is equal.
Mobs can not spawn closer to you than 24 m (but despawn when farther, than 128 m away) so do not stand too close to where you expect them to spawn.
In order to optimize the spawn rate, it is a good idea to hollow out a 16×16 width (= 1 chunk) and at least 3 blocks of high space within a slime chunk. Waiting can take even longer in naturally generated caves and hallways.
Using lighting to avoid the spawning of other mobs (light has no effect on slime spawning in slime chunks). But don’t use torches on the ground or glowstone, as the spawn rate will be decreased by these blocks. Jack-O-Lanterns or Redstone Lamps + Redstone Blocks can be safely used.
Often, the spawning of aggressive mobs may be jammed by mobs that do not immediately dispawn. You can walk around 200 m in either direction if that happens and then come back in order to force them to despawn.
Mobs are unable to spawn on bedrock (see Block Compendium)
Slimes don’t spawn in harmony,
Slimes in mushroom island biomes do not spawn.
Requirements
Seed
For the above purposes, to use Slime Finder, you need to know the seed of your planet, unless, of course, you want to find a seed for a new world.
The app is able to fetch the seed from your savegame if you’re playing SSP. Alternatively, you can use the Ingame /seed command. In SMP, if you have enough rights, you can use the same command. Otherwise, though, you’re reliant on the server owner, who started the world and has access to the backup and configuration data.
Technical
Some relatively modern web technologies are used in this app. As a consequence, for older browsers, certain features may be disabled. I suggest that you use the new update of a big browser, like Chrome, Firefox, Edge, or Safari.
Usage
Seed Selection
Selecting a seed and a version is the first thing you can do. You can either manually type it in, or you can load it from your backup game. You can do the latter by clicking on “Load from Save…” and selecting your level.dat or drag and drop the level.dat file into the window of your browser. Level.dat is a small file located in every Minecraft Savegame folder.
Savegames can be found in the Save folder of your Minecraft installation.
Levels allow you, without having to load your savegame every time, to store and reuse seeds on this website. The seed will automatically be saved as a level when loading a seed from a level.
Also, you should realise that a seed is always a number . It will be converted to a number if you type something else (like letters). The app does this the same way as Minecraft does, so letters (and other characters) are also safe to use.
When your seed and version have been entered, you can start using the map. Use your arrow keys to scroll while pointing your mouse cursor to the map, or move your mouse while holding down the left mouse button.
The slider below the map or your mouse wheel may be used for zooming. The lower inputs allow you to go to the map’s specific point (for example, your base) and place a marker there.
By double-clicking on the map, you can always delete and add the marker. You can save the currently displayed map as a png image file using the “Save Map” icon.
Touchscreen
An extra option for enabling/disabling touchscreen control will appear below the map when using a touch-enabled computer.
With that option allowed, you can drag and drop the map to navigate with your finger, click to zoom in and out, and tap and hold to set a marker on the map. You can also easily enable/disable the feature by double-tapping on the map.